Source Code Deploy Guide
This document describes how to deploy each module through source code compilation. Assume that it is deployed according to the following architecture:
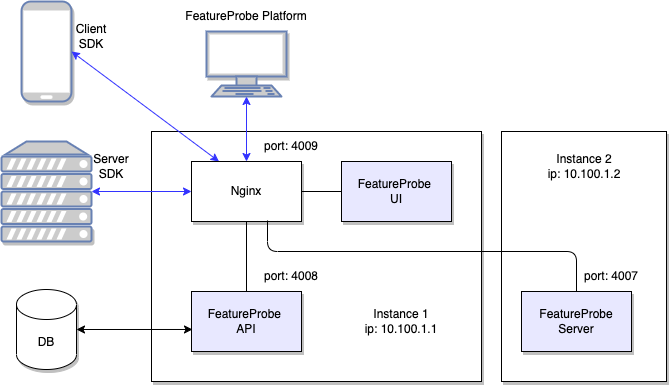
There are three main modules that need to be compiled and deployed:
From v1.11.0 and later versions, the API service will integrate the UI service. After starting the API service, the root path to access the API service is the FeatureProbe UI page. According to the requirements of the deployment architecture, you can choose whether to deploy UI services separately.
| Sample machine | Deployment module | Port |
|---|---|---|
| 10.100.1.1 | FeatureProbe API | 4008 |
| 10.100.1.1 | FeatureProbe UI | 4009(Nginx)(Optional) |
| 10.100.1.2 | FeatureProbe Server | 4007 |
Create database
Environment preparation
- MySQL 5.7+
Create the
feature_probedatabase:CREATE DATABASE feature_probe;
There is no need to manually create table structures. All tables and initialization data are automatically created when the API service is started for the first time. If you want to import DML/DDL manually, please refer to the Database Setup document.
Compile and deploy API service
Compilation steps
Compilation environment
- JDK 1.8+
- Maven 2.0+ : how to install
Obtain the source code and compile the deployment package:
git clone https://gitee.com/FeatureProbe/FeatureProbe.git
cd FeatureProbe/api
mvn clean package
After the compilation is completed, a jar deployment file named after the version will be generated in the current directory, such as target/api-1.1.0.jar.
Deployment steps
Deployment environment
- JDK 1.8+
Place
api-1.1.0.jarin the deployment server, fill in the database link configuration, and start it with4008port:cautionThe database-related information in the following script needs to be replaced with the actual database information you use.
java -jar api-1.1.0.jar --server.port=4008 \
     --spring.datasource.jdbc-url=jdbc:mysql://{MYSQL_DATABASE_IP}:{MYSQL_PORT}/feature_probe \  # 数据库 IP/端口和库名
     --spring.datasource.username={MYSQL_USERNAME} \
--spring.datasource.password={MYSQL_PASSWORD}infoFor a more detailed description of the startup parameters of the API service, see FeatureProbe API parameters
Check whether the service is running successfully
Run on the deployment machine:
curl "http://localhost:4008/actuator/health"If the following information is displayed, the startup is successful:
{
    status: "UP"
}
Compile and deploy Server service
Compilation steps
Environment preparation
Rust
$ curl --proto '=https' --tlsv1.2 -sSf https://sh.rustup.rs | shOr, install from domestic mirror
1. Modify ~/.zshrc or ~/.bashrc:
~~~bash
export RUSTUP_DIST_SERVER="https://rsproxy.cn"
export RUSTUP_UPDATE_ROOT="https://rsproxy.cn/rustup"
~~~
2. Install
~~~bash
$ curl --proto '=https' --tlsv1.2 -sSf https://rsproxy.cn/rustup-init.sh | sh
~~~cautionPay attention to the prompt on the last line after installation, follow the prompt command to reload the environment variable, and the installation will take effect.
Configure dependant download mirror, create file:
~/.cargo/config[source.crates-io]
# To use sparse index, change 'rsproxy' to 'rsproxy-sparse'
replace-with = 'rsproxy'
[source.rsproxy]
registry = "https://rsproxy.cn/crates.io-index"
[source.rsproxy-sparse]
registry = "sparse+https://rsproxy.cn/index/"
[registries.rsproxy]
index = "https://rsproxy.cn/crates.io-index"
[net]
git-fetch-with-cli = true
Get the source code and compile the deployment package
git clone https://github.com/FeatureProbe/FeatureProbe.gitCompile in the source code directory:
cd server
cargo build --release --verbose
After compiling, an executable binary file will be generated in the
target/release/directory:$ ls target/release/
feature_probe_server
Deployment steps
Environment preparation
- none
Put the generated
feature_probe_serverfile on the server and create the startup scriptstart-feature-probe-server.sh:cautionIn actual use, you need to modify the ip and port in the script below to the ip and port of the actual deployment environment of your API service.
#/bin/bash

export FP_SERVER_PORT=4007 # FeatureProbe Server port
export FP_TOGGLES_URL=http://10.100.1.1:4008/internal/server/toggles # FeatureProbe API IP and port
export FP_EVENTS_URL=http://10.100.1.1:4008/internal/server/events
export FP_KEYS_URL=http://10.100.1.1:4008/internal/server/sdk_keys
export FP_REFRESH_SECONDS=1

./feature_probe_serverinfoFor a more detailed description of the startup parameters of the Server service, see FeatureProbe Server parameters
Execute the startup script to run the service:
sh ./start-feature-probe-server.shCheck whether the service is running successfully, and run it on the deployment machine:
curl "http://localhost:4007/"If the following information is displayed, the startup is successful:
<h1>Feature Probe Server</h1>
Compile and deploy UI service
Compilation steps
Environment preparation
- Node.js 16.13+ : Download
infoIt is recommended to switch to the npm China mirror station in China:
npm config set registry https://registry.npmmirror.com/Obtain the source code and compile a deployable static file:
git clone https://gitee.com/FeatureProbe/FeatureProbe.git
cd FeatureProbe/ui
npm install
npm run build
After compiling, deployable static files will be generated in the
builddirectory. As follows:$ ls build
asset-manifest.json favicon.ico index.html static/[Optional] Configure output path:
For production environment deployment, there are two options for domain name configuration:
- Separately deploy the FeatureProbe service as an independent domain name, for example: directly access the FeatureProbe entry page through https://your.domain.com
- Share a domain name with several services, and distinguish services in the form of path (/path), for example: access the FeatureProbe entry page through https://your.domain.com/featureprobe
At present, we support the first method by default. If you deploy in the second method, you need to make some changes to the source code:
(1) Open
craco.config.jsfilecd ui
vi craco.config.js(2) On the basis of the original configuration, add the
publicPathfield in the webpack - configure - output object, for example, set the value to: /featureprobe/module.exports = {
webpack: {
configure: {
output: {
publicPath: '/featureprobe/'
},
}
}
};(3) After executing the
yarn buildcommand, view the index.html file throughvi build/index.html, you can find that the static resource js and css files in the file have been added with the prefix configured in publicPath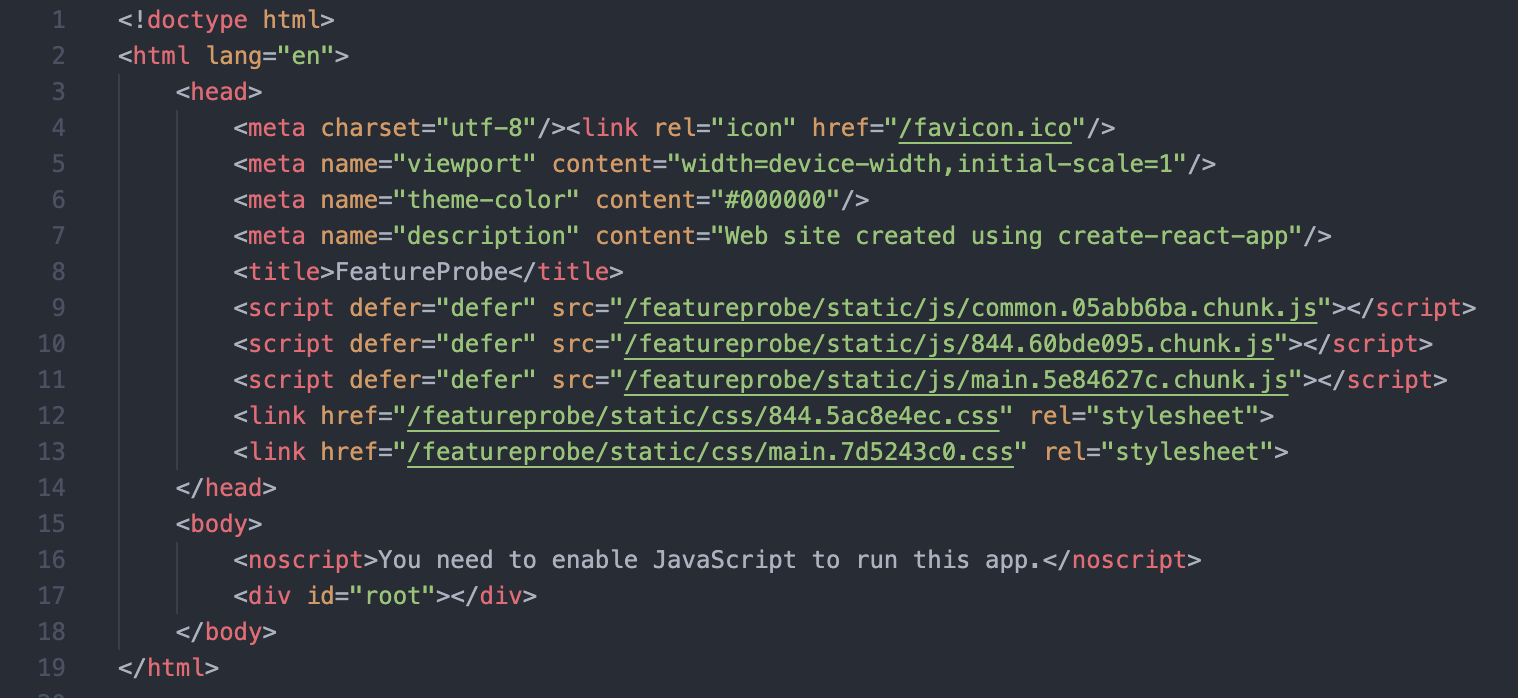
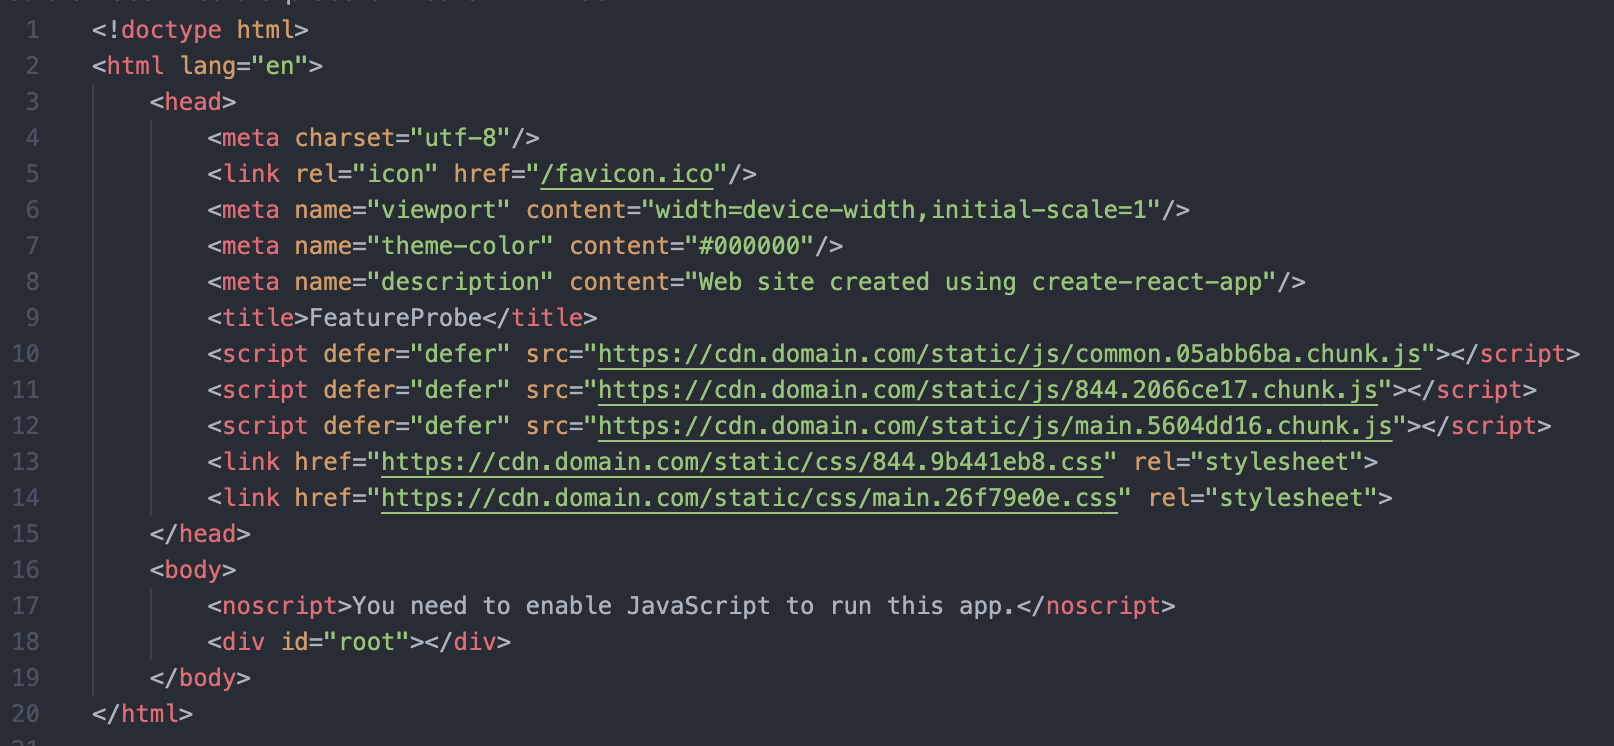
(4) In order to speed up access, you can choose to upload static resource (js, css, etc.) files to the CDN server, and you can also configure publicPath as the address of the CDN during the compilation phase:
module.exports = {
   webpack: {
      configure: {
         output: {
            publicPath: 'https://cdn.domain.com/'
         },
      }
   }
};
The static resources (js, css, etc.) in the compiled html are all paths carrying the CDN address:
Deployment steps
Environment preparation
- Nginx
Copy all the files and folders under
buildgenerated by compilation to the/usr/share/nginx/html/directory.
Configure Nginx
Create Nginx configuration:
/etc/nginx/conf.d/feature_probe.confcautionIn actual use, you need to modify the ip and port in the script below to the ip and port of the actual deployment environment of the service.
upstream featureProbeAPI {
    server 10.100.1.1:4008; # FeatureProbe API IP and port
}


upstream featureProbeServer {
    server 10.100.1.2:4007; # FeatureProbe Server IP and port
}

server {
    listen 4009; # UI port

    location / {
        index index.html index.htm;
        root /usr/share/nginx/html; # UI static file directory
        try_files $uri /index.html;
    }

    location /api { # Unified forwarding to featureProbeAPI service when accessing /api
        proxy_set_header X-Real-IP $remote_addr;
        proxy_set_header X-Forwarded-For $proxy_add_x_forwarded_for;
        proxy_set_header X-NginX-Proxy true;
        proxy_pass http://featureProbeAPI/api;
        proxy_ssl_session_reuse off;
        proxy_set_header Host $http_host;
        proxy_cache_bypass $http_upgrade;
        proxy_redirect off;
    }

    location /server/api { # Unified forwarding to featureProbeServer service when accessing /server/api
        proxy_set_header X-Real-IP $remote_addr;
        proxy_set_header X-Forwarded-For $proxy_add_x_forwarded_for;
        proxy_set_header X-NginX-Proxy true;
        proxy_pass http://featureProbeServer/api;
        proxy_ssl_session_reuse off;
        proxy_set_header Host $http_host;
        proxy_cache_bypass $http_upgrade;
        proxy_redirect off;
    }
}
[optional] In actual use, if you configure a custom output path, for example: configure
publicPathto/featureprobe/, you need to changelocation /in the above nginx configuration tolocation /featureprobe/to be correct matches static files such as html, js and css.location /featureprobe/ {
index index.html index.htm;
root /usr/share/nginx/html; # UI static file directory
try_files $uri /index.html;
}Execute
reload nginxconfiguration to make the above configuration take effect:nginx -s reload
Service verification
Platform
In actual use, you need to modify the following ip and port to the ip and port of the actual deployment environment of your ngnix service.
Visit http://10.100.1.1:4009 in the browser and use the following account and password to log in to verify whether the deployment is successful:
- username:
admin - password:
Pass1234
Server Side SDK Access
The server remote_uri address used by the SDK connection is the ngnix machine address and service port configured above, plus the path /server, for example: http://10.100.1.1:4009/server in the above example.
For specific steps, please refer to Rollout Tutorial